Monday, 20 January 2014

Android SQLite data to CSV format

SQLite to CSV

Its easy to export your current SQLite data into Excel or CSV format.

This can be achieved by simple code, which includes csv text file format, which we need to write through code.

CSV format works on the basis of comma and new line.

The below code includes.
1. File creation
2. Writing data to file
3. Fetching data from SQLite & writing in csv format.

You can modify your format however you want, keeping in your mind about commas.

Call this method & pass your file & directory path.


private Boolean backupDatabaseCSV(String outFileName) {
    MyLog.d(TAG, "backupDatabaseCSV");
    Boolean returnCode = false;
    int i = 0;
    String csvHeader = "";
    String csvValues = "";
    for (i = 0; i < GC.CURCOND_COLUMN_NAMES.length; i++) {
        if (csvHeader.length() > 0) {
            csvHeader += ",";
        }
        csvHeader += "\"" + GC.CURCOND_COLUMN_NAMES[i] + "\"";
    }

    csvHeader += "\n";
    MyLog.d(TAG, "header=" + csvHeader);
    dbAdapter.open();
    try {
        File outFile = new File(outFileName);
        FileWriter fileWriter = new FileWriter(outFile);
        BufferedWriter out = new BufferedWriter(fileWriter);
        Cursor cursor = dbAdapter.getAllRows();
        if (cursor != null) {
            out.write(csvHeader);
            while (cursor.moveToNext()) {
                csvValues = Long.toString(cursor.getLong(0)) + ",";
                csvValues += Double.toString(cursor.getDouble(1))
                        + ",";
                csvValues += Double.toString(cursor.getDouble(2))
                        + ",";
                csvValues += "\"" + cursor.getString(3) + "\",";
                csvValues += Double.toString(cursor.getDouble(4))
                        + ",";
                csvValues += Double.toString(cursor.getDouble(5))
                        + ",";
                csvValues += "\"" + cursor.getString(6) + "\",";
                csvValues += Double.toString(cursor.getDouble(7))
                        + ",";
                csvValues += Double.toString(cursor.getDouble(8))
                        + ",";
                csvValues += Double.toString(cursor.getDouble(9))
                        + "\n";
                out.write(csvValues);
            }
            cursor.close();
        }
        out.close();
        returnCode = true;
    } catch (IOException e) {
        returnCode = false;
        MyLog.d(TAG, "IOException: " + e.getMessage());
    }
    dbAdapter.close();
    return returnCode;
}

Enjoy converting SQLite to CSV.

Saturday, 18 January 2014

Andriod Development Multi screen support

As Android is a big fragments and also there are number of manufactures, which results into number of screens, which varies from manufactures to manufactures and device to device. Its the responsibility of Android developer to his app responsive, here is the collection of drawable folders which are specific to support particular screens.

Here is the demonstration to how to develop multi screen application for your project.


Few of the drawable folders are as follows

  1. drawable
  2. drawable-ldpi
  3. drawable-mdpi
  4. drawable-hdpi
  5. drawable-xhdpi
  6. drawable-xxhdpi
  7. drawable-large-mdpi
  8. drawable-large-hdpi
  9. drawable-xlarge-mdpi
  10. drawable-xlarge-hdpi

drawable
Common image folder to support all screens


drawable-ldpi
for small screens


drawable-mdpi
for medium screen phones


drawable-hdpi
for high definition screen phones


drawable-xhdpi
for very high definition screen phones


drawable-xxhdpi
for very high definition devices


drawable-large-mdpi
for 7" tablets


drawable-large-hdpi
for 7" tablets (Specially for Nexus7)


drawable-xlarge-mdpi
for 10" tablets

drawable-xlarge-hdpi
for 10" tables high resolution

so keep images in each folder & check what your device supports, happy designing. 

        Friday, 17 January 2014

        Android Multiscreen support Layout folders

        Being an Android developer one should know the different layout folders.
        Layouts play an important role in UI concept of Android. 

        Here are the few layouts folders which are used to support different screen sizes like

        1. Small Screen phones
        2. Medium Screen phones
        3. Large Screen Phones
        4. 7" Tablets
        5. 10 " Tablets


        ·         res/layout/ 

        for Phones 


        ·         res/layout-port

        for Phones only portrait screen


        ·         res/layout-land

        for Phones only Landscape screen


        ·         res/layout-sw600dp/

        for 7" Tablets


        ·         res/layout-sw600dp-port/

        for 7" Tablets only portrait


        ·         res/layout-sw600dp-land/

        for 7" Tablets only landscape


        ·         res/layout-sw720dp/

        for 10" Tablets


        ·         res/layout-sw720dp-port/

        for 10" Tablets only portrait


        ·         res/layout-sw720dp-land/

        for 10" Tablets only landscape


        ·         res/layout-xlarge/

        for pre 3.2" Tablets 


        ·         res/layout-xlarge-port/

        for pre 3.2" Tablets to support portrait only


        ·         res/layout-xlarge-land/

        for pre 3.2" Tablets to support landscapre only


        ·         res/layout-small/

        for small screens 


        ·         res/layout-small-port/

        for small screens to support portrait screens only 


        ·         res/layout-small-land/

        for small screens to support landscape screens only 


        ·         res/layout-large/

        for large screens 


        ·         res/layout-large-port/

        for large screens to support portrait screens only 


        ·         res/layout-large-land/
        for large screens to support landscape screens only 

        Sunday, 29 December 2013

        Android APK (File format)


        Android Application Package APK (.apk) is the set of compressed files used to distribute and install application software on well know Android Operating system by Google Inc.

        Android apk contains the number of files that all contains program's code, assets, resources, permissions, certification and manifest file.

        You can also check the contents of apk file by just following these steps.

        1. Rename .apk extension to .rar
        2. Extract these files with help of decompression tools such as Winrar or Winzip
        Usually apk file contains the following file 

        Android apk file format

        • lib
        • res
        • assets
        • classes.dex
        • AndroidManifest.xml
        • META-INF directory
        • resources.arsc

        lib

        It contains the compiled code that is specific to a software layer of a processor, the directory is split into more directories within it.
        • armeabi: compiled code for all ARM based processors only
        • armeabi-v7a: compiled code for all ARMv7 and above based processors only
        • x86: compiled code for x86 processors only
        • mips: compiled code for MIPS processors only

        res

        Contains the resources file such as layout, images and few xml files, which are not compiled into resources.arsc


        Assets

        It contains assets files specific to a particular project, which can be retrieved with use of Assets Manager, these files have been integrated to a project by the user. 


        Classes.dex

        It contains the compiled classes in the dex format, which is being understandable by Dalvik Virtual Machine


        AndroidManifest.xml

         An additional Android manifest file, describing the name, version, access rights, referenced library files for the application. 


        META-INF directory

        Its java's internal meta directory contains the following files 
        • MANIFEST.MF: the Manifest file
        • CERT.RSA: The certificate of the application.
        • CERT.SF: The list of resources and SHA-1 digest of the corresponding lines in the MANIFEST.MF file

        resources.arsc

        Contains the pre compiled resources file such as layout, images and few xml files


        Thursday, 26 December 2013

        Different ways to Install apk.

        There are different ways to install apk other than market, here are few check it out.


        1.  Using USB 

        • Connect USB to your PC
        • If you device OS version is greater than 2.3 then 
          • Settings
          • Developer Option
          • Check Install from Unknown resource
        • If you device OS version is 2.3 or less 
          • Settings
          • Applications
          • Check Unknown resource
        • Copy apk file into your SD card or Phone Internal Memory
        • Locate the apk file & click on it. 
        • Select package installer 


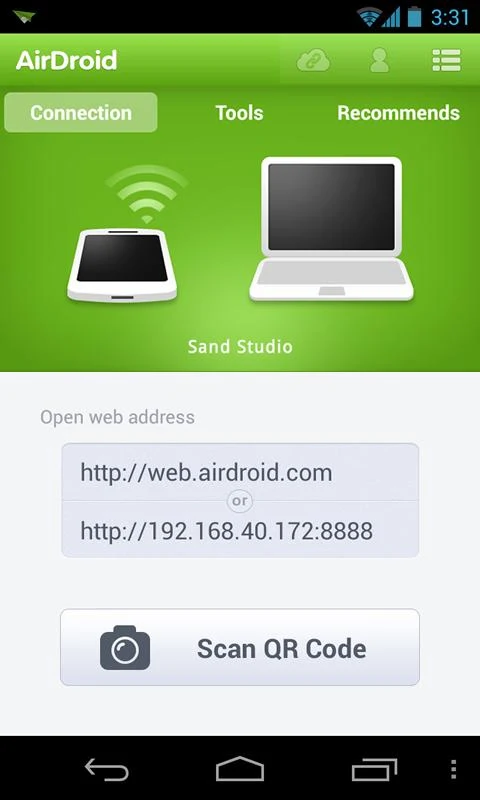
            2. Using AirDroid


        • Select App as shown in red box for below image and also drag and drop apk into the green box shown. 

        •  Mission Accomplished 


              3. Using Command Line


        Happy Installing....
        Feel free to add any other mothod.

        Thursday, 12 December 2013

        Android Native Data to HTML page

        Here comes one more Blog on HTML5.

        Have you ever tried sending data from Android native to HTML page? like SMS, Call, JSON Array etc.

        This blog gives you a clear picture how to pass Data to HTML5.

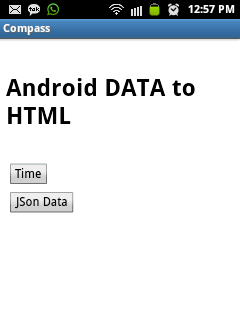
        I have created 2 methods getTimeAndroid() which passes String to setTime() (javascript method)and getValueJson() passes JsonArray to setJson() (javascript method) respectively.

        You need a "JavascriptInterface" which is a class written by you in your activity, a HTML page where you define methods & pass arguments to Android java class.


        Android Native code 


        package com.rnd.rnd;

        import java.text.SimpleDateFormat;

        import org.json.JSONArray;
        import org.json.JSONException;
        import org.json.JSONObject;

        import android.annotation.SuppressLint;
        import android.app.Activity;
        import android.content.Context;
        import android.os.Bundle;
        import android.webkit.JavascriptInterface;
        import android.webkit.WebView;

        public class HtmlToAndroid extends Activity{
        WebView mWebview;
        @SuppressLint("SetJavaScriptEnabled")
        @Override
        protected void onCreate(Bundle savedInstanceState) {
        super.onCreate(savedInstanceState);
        setContentView(R.layout.html_layout);
        // Assing webview object
        mWebview = (WebView)findViewById(R.id.webview);
        // Load your html page here
        // Enable javascript 
        mWebview.getSettings().setJavaScriptEnabled(true);
        // Adding javascript interface to your page. 
        // Pass the JavaScriptInterface class & related String "AndroidNativeCode" which will be used to call android methods written below. 
        mWebview.addJavascriptInterface(new JavaScriptInterface(this), "AndroidNativeCode");
        mWebview.loadUrl("file:///android_asset/www/index.html");
        }
        public class JavaScriptInterface {
                Context mContext;

             
                JavaScriptInterface(Context c) {
                    mContext = c;
                }

                // Simple method to pass Data to HTML
                
             @SuppressLint("SimpleDateFormat")
        @JavascriptInterface
                public void getTimeAndroid() {
             
            long date = System.currentTimeMillis(); 

        SimpleDateFormat sdf = new SimpleDateFormat("dd MMM yyyy HH:mm");
                     mWebview.loadUrl("javascript:setTime('"+sdf.format(date)+"')");
             
                }
             
             // method to send JsonArray to HTML
             @JavascriptInterface
             public void getValueJson() throws JSONException
             {
            JSONArray jArray = new JSONArray();
              
             
              JSONObject jObject = new JSONObject();
              
              jObject.put("Name", "Jackson");
              jObject.put("Age","24");
              jArray.put(jObject);
              
              jObject = new JSONObject();
              jObject.put("Name", "Jenny");
              jObject.put("Age","23");
              jArray.put(jObject);
              
              jObject = new JSONObject();
              jObject.put("Name", "Fenny");
              jObject.put("Age","28");
              jArray.put(jObject);
              
              mWebview.loadUrl("javascript:setJson("+jArray+")");
                  
              
             }
                
            }
        }


        HTML page

        <html>
        <head>
        <title>Android is Awesome!!</title>

        <script type="text/javascript">

        function getTime()
        {
        AndroidNativeCode.getTimeAndroid();
        }


        function setTime(time)
        {
        document.getElementById('datetime').innerHTML = time;
        }


        function getJson()
        {
        AndroidNativeCode.getValueJson();
        }

        function setJson(Jsonobject)
        {

        var log="";
        for(var i =0; i<Jsonobject.length;i++)
        {
        log+= Jsonobject[i].Name +" : "+ Jsonobject[i].Age + "<br> <br>" ;

        }
        document.getElementById('JsonDiv').innerHTML = log;
        }
        </script>

        </head>

        <body>
        <br>
        <h1>Android DATA to HTML</h1>
        <br>
        <Button onclick="getTime()">Time</Button>
        <div id="datetime"></div>


        <Button onclick="getJson()">JSon Data</Button>
        <div id="JsonDiv"></div>

        </div>


        </body>
        </html>


        Android Layout


        <?xml version="1.0" encoding="utf-8"?>
        <LinearLayout xmlns:android="http://schemas.android.com/apk/res/android"
            android:layout_width="match_parent"
            android:layout_height="match_parent"
            android:orientation="vertical" >

            <WebView
                android:id="@+id/webview"
                android:layout_width="match_parent"
                android:layout_height="match_parent" />

        </LinearLayout>

        If you like it then please share it. Also if you know anything like please feel free to share

        Also see 


        1. Also check out how to operate your Android phone from Window OS. 
        2. Android apk generation through command line 
        3. Android SQL browsing through Windows
        4. Access Android Native code from HTML
        5. ADB over Wifi 
        6. EditText to TextView conversion 
        7. SVN for Android Eclipse